Alon Control Column Removal
Removing the control column from the airplane is not a terribly difficult task, but it does take a good bit of effort, and a good bit of patience. The following is a summary of the procedure that I used. This is just a guideline. Your airplane may be somewhat different from mine, or you may find a better way to do some of these steps.
1. If the airplane has a Press to Talk button on the control wheel(s), then disconnect those wires so that the control wheels and shafts can be removed.
2. Remove the seats from the airplane.
3. Under the instrument panel, remove the cotter pins, nuts, special cupped taper pin washers and taper pins that attach the control wheel shafts to the u-joints. Leave the taper pins that attach the u-joints to the rest of the control column installed for now. They can be removed later when the control column is on a work bench. The taper pins may be very difficult to remove. They are usually pretty well jammed in place. Do NOT try to drive them out with a hammer. After removing the cotter pin, nut and cupped washer, put a nut on the threaded end of the taper pin so that it is flush with the end of the pin to give you a surface to push on. Place a socket over the large end of the taper pin so that it presses on the control wheel shaft and leaves room for the large end of the pin to come out. Use a medium sized c-clamp to press on the small end of the taper pin. Basically you are trying to push the taper pin out of the shaft and into the socket. If the pin won't back out, put lots of pressure on it with the clamp and try tapping the clamp with a hammer. Sometimes the shock of the hammer blow will cause the pin to pop loose. By the way, don't even bother trying to use a small, flimsy c-clamp unless you have one that you want to bend or break.
4. After the taper pins are removed, remove the control wheels and shafts from the airplane.
5. Remove the battery access cover and the sheet metal cover that covers the space under the seats.
6. Disconnect the negative battery lead and push it out of the way so it can't get to the negative battery terminal. (You don't need any fireworks or arc welding going on while standing on your head under the instrument panel.)
7. Now remove the forward and aft cockpit floors.
8. If your Alon does not have rudder pedals, you may have to disconnect the large rudder centering spring on the bottom right side of the column. This spring is attached to the rudder pedal assembly on an Alon that has rudder pedals and is evidently tied in with the aileron linkage somehow on an Alon without rudder pedals. I understand that this can be disconnected easily by loosening the nut on the end of the spring fitting that is exposed on the forward side (engine side) of the lower firewall. Be sure to measure and record the length of the threads exposed beyond the nut so that you can put it back the way it was. Again, this does NOT need to be done on an Alon that has rudder pedals.
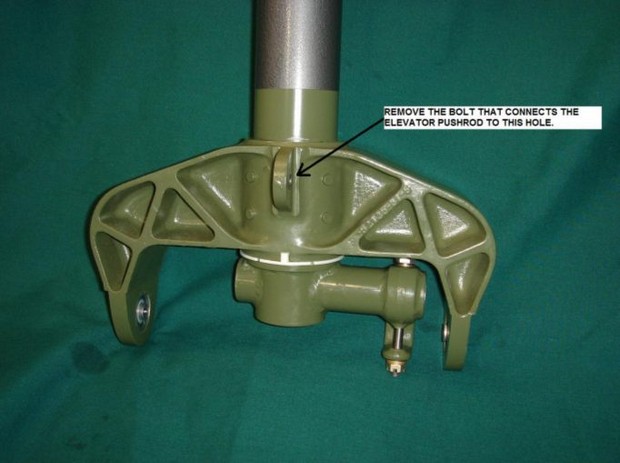
9. Locate the fork rod end on the forward end of the elevator pushrod that is attached to the casting at the bottom of the control column. Remove the bolt that attaches the rod end to the casting.

10. Remove the cotter pin, nut, washer(s) and bolt at the aft end of the elevator pushrod and remove the pushrod from the airplane.
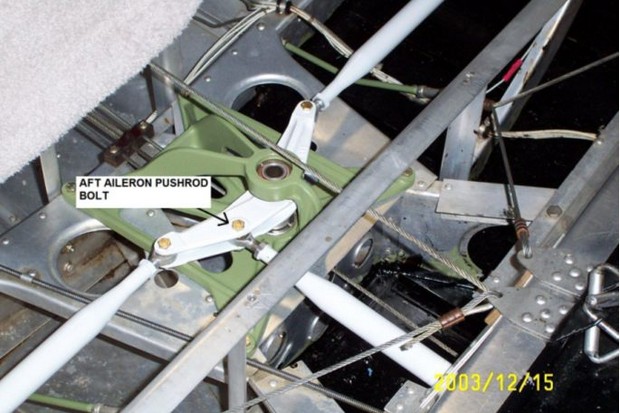
11. Locate the rod end on the aft end of the aileron pushrod back at the 'mixer' bellcrank under the baggage compartment. Disconnect this rod end from the bellcrank. Note how the bolt is oriented and how any washers are installed so that you can put them back the same way. The vertical clearances on the ends of the bolts on this bellcrank are very close, and putting in the wrong length bolt, or putting the washers in the wrong place could result in a clearance problem or jammed controls.

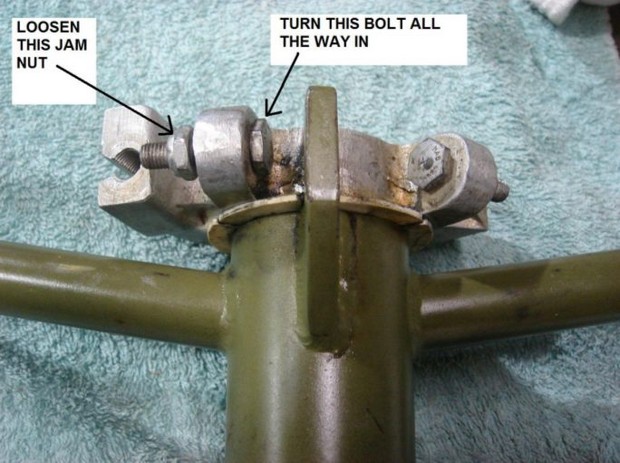
12. Loosen the jam nut, and screw in the left hand stop bolt in the aluminum casting at the top end of the control column. This will allow you to turn the center control shaft far enough to remove the aileron pushrod bolt at the bottom of the control column. If you want to, you can measure the position of this bolt before disturbing it, however the position of this bolt will be adjusted again when the ailerons are rigged at the completion of the job. This bolt limits the aileron travel.

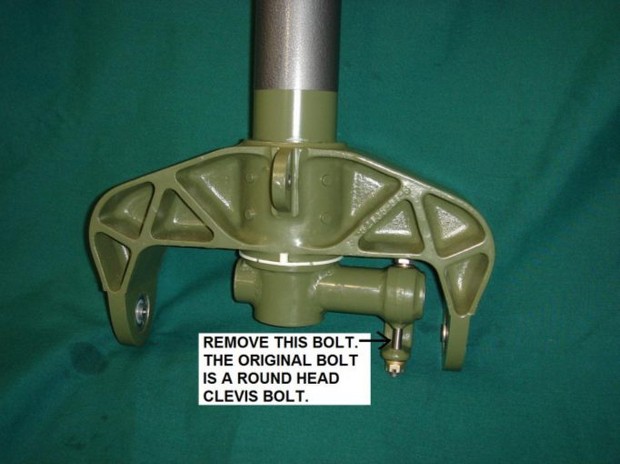
13. Remove the cotter pin, nut and any washers from the bolt in the rod end at the forward end of the aileron pushrod. This is easier said than done. Now turn the casting at the top of the control column all the way in the direction that moves the aileron pushrod fully forward (against the stop bolt that you just turned in) and remove the forward aileron pushrod bolt. The bolt head should just clear the forward edge of the aluminum casting at the bottom of the control column. Now remove the aileron pushrod from the airplane by removing it rearward.

14. Remove the two sets of cotter pins, nuts and bolts that attach the bottom of the control mast to the airframe. Note which way the bolts are installed and where any washers are located. These bolts may be pretty well stuck in the holes and might require a bit of a struggle to get them out.
15. Now remove the control column from the airplane. This can take a while to figure out how to maneuver the thing in a manner that allows you to get it out. Mine came out without too much of a fight. If I recall correctly, I was able to lift the column upward slightly to get the bottom end up out of the channels that the bottom bolts go through, and then push the bottom of the column forward towards the rudder pedals while tipping the top of the column back towards the instrument panel. With the column tipped this way, it just cleared the bottom of the instrument panel. Depending on what is under your instrument panel, you may have to move or remove other 'stuff' to get the column out. Just be careful not to break anything while wrestling with it. Also, when you finally get it out, remember how you did it because you'll need to put it back in the same way.
| << previous Introduction | next Disassembly and Inspection >> |