FUEL TANK REPAIRS
Illustrated examples:
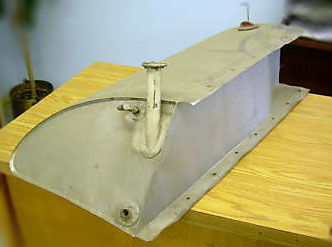
Look at a few examples and the problems that some discovered. The images do tell a lot.
| AN901-6A is the aluminum washer at bottom fitting - need two each main aluminum tank. |
|---|
| The basic dimensions of the fuel cap gaskets is 2 1/4 outside, 1 1/2 inside by 1/8 thick. So the Real Gasket PN RG-265-1/8 fills the bill. |
|---|
Steps to follow for fixing them right:
BY SYD COHEN E.O.C. #4095
Many people are experiencing fuel tanks leaking or seeping, and the first thought is usually to slosh the tanks. If you use auto gas, do not slosh your tanks. There is no sloshing compound approved by the Feds or the compound suppliers for use with auto gas. Also, sloshing does not cure a corrosion problem.
The following procedure will work much better. This procedure should only be done under the supervision of an A & P mechanic.
1. Drill out all of the rivets with a #31 drill bit.
2. Use paint stripper to soften the old tank sealant and use a beveled putty knife to separate the metal sides from the top and bottom. Do not dig into the metal. Use the same method to separate the quick-drain fittings and all other fittings.
3. After the parts are separated, use more paint stripper to remove any remaining sealant. Paint stripper will also remove any old sloshing compound.
4. Order a sufficient supply of 5/32" dia. soft flush rivets, (AN 426A-5) 3/16" long and redrill the holes in the tanks for these rivets using a #21 drill bit. You must re-dimple the rivet holes for the 5/32" flush rivets. Cleco as you go.
5. Etch all inside surfaces with metal etch such as Stits Aluma-dyne etch or equivalent. Follow the directions carefully. Rub with a coarse (reddish-brown) Scotch-Brite pad dipped into the solution. Protect skin with latex gloves and eyes with eye protection.
6. If deep corrosion is found, the part will have to be scrapped. New parts can be obtained from Univair. (maybe not anymore - the editor)
7. Treat inside surfaces with aluminum conversion coating such as Stits Aluma-dyne Conversion Coating or equivalent. Follow the directions carefully.
8. Spread PRC or Pro-Seal sealant on both mating surfaces as you close them together. Spread with a Popsicle stick. Use 2 hour or slower PRC or Pro-Seal for sealant. Make sure the PRC or Pro-Seal is not out-dated. Protect your hands with latex gloves. PRC and Pro-Seal is extremely sticky stuff and will get all over everything if you are not careful. (We used 4 people for this operation. One person held the tank in the proper position, one placed the rivets in the holes and removed clecos, one spread the PRC as we went, and one squeezed the rivets. This way only one person gets full of the goop, and it does not get all over the tools.)
(Steps 9, 10, 11 & 12 are for the 8 gallon wing tanks. See step 13 for 9 gallon wing tanks. See step 14 for header tank)
9. Cleco all the surfaces together except for the outboard end.
10. Squeeze the rivets with a rivet squeezer.
11. Reach inside the tank through the open outboard end and smooth the PRC or Pro-Seal bead with your finger or a Popsicle stick, forcing it back into the seams.
12. Spread PRC or Pro-Seal sealant on the outboard end flange and slide it into place. Cleco and rivet it into the tank.
13. If sealing a 9 gallon wing tank, where the inboard end, back and outboard end are one piece, start spreading the PRC or Pro-Seal in the leading edge and work toward the back on the top and the bottom, clecoing and riveting.
14. If sealing a riveted header tank, do the top seam first, the front end next, and the aft end last, as in Step 12. Before spreading the sealant or riveting, place the tank on a flat surface to be sure the front and rear ends are in alignment. Cleco in place before dimpling.
15. Clean off the excess PRC or Pro-Seal with paint stripper and an acid brush, but be careful! Do not let the paint stripper get into the seam. Clean the tools and clecos with paint stripper also.
Remember--this should only be done under the supervision of an A & P mechanic! We found severe corrosion in my 8 gallon wing tanks in the inboard end seams, the back seams and the areas under the quick-drain fittings. The only parts we could save were the outboard ends. -Syd


